Growing Great Big Tasty Carrots
- Oct 26, 2023
- 11 min read
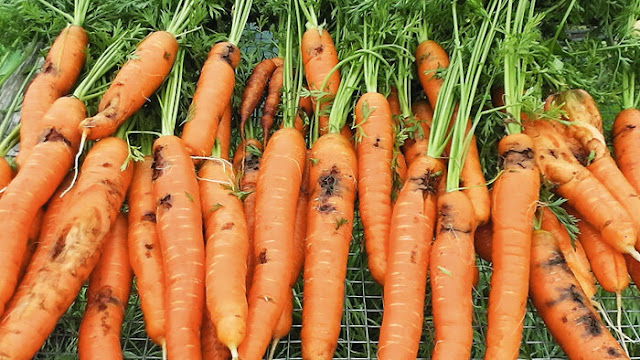
I posted this picture of my carrots the other day and got so many questions about how to grow good, long carrots. Even afterwards, as I talked with friends, growing nice carrots are the number one thing on everyone’s mind.

It seems that getting them to size up properly is the main issue, many of you are getting small stubby carrots, wee spindly ones, or great tops but small bottoms. Here are some of the key things you need to know to grow really great tasting, long, straight, lovely carrots.
All of these carrots in the pics are from my gardens… If I can do this, you can too, I promise!

Soil Prep - Great soil is the key to everything….
Loose and friable soil - For long, straight carrot, your soil needs to be well-draining, loose and crumbly to a depth of at least 10 inches. You should be able to easily to push your fingers into the soil without meeting much resistance, no rocks or hard clumps.
Here on the prairies, we tend to have heavy clay soil, makes it difficult for the carrot to grow through. The answer to amazing loose and friable soil is to feed your soil with organic matter once or twice a year. On the island, the soil is very sandy or filled with fillers, like wood chips, low in nutrients. The answer to that soil is also adding lots of organic matter.
Feeding soil with organic matter feeds the soil-life (organisms, fungi, bacteria, worms…) that make your soil better. The soil-life breaks down that matter to give you lovely, loose, nutrient rich soil for healthy thriving plants. I feed my garden in fall, after harvest and garden clean up, but some prefer to add a bit in fall and then add more in spring.
If you are having a hard time growing great crops of any kind, I highly recommend adding even more organic matter to your beds, copious amounts thereof. This will really increase the soil-life and the activity in your soil, which in turn improves the health and production of your plants. Organic matter is anything that breaks down naturally to feed your soil, like leaves, leaf mould, grass clippings, kitchen scraps, but the easiest to apply in large amounts is compost or manure.
In addition, if you find that things are not growing as you like, before changing anything else or adding other amendments, first try adding organic matter of a different sort, or from a different source than you usually use.
Manure - To feed my soil in fall, I add an inch/two of composted chicken manure on top of the beds. Chicken manure is a well balanced, relatively inexpensive, weed-free, soil conditioner. It is my top pick, with steer or mushroom coming in as next best.
Adding a different manure on other years introduces new soil conditioners, and thus new soil life, to your garden beds. Switch it up from time to time.
Compost- Sometimes to switch it up, we use a fish compost (such as SeaSoil) instead. This introduces new life to the soil, different micro-organisms, fungi, and bacteria. Any kind of compost is a fantastic amendment and soil conditioner, fish, green bin program, or homemade.
Introducing new conditioners, and new soil life, to your garden beds annually … as Martha would say, it’s a good thing.

At this new house on the prairies, my beds were built last year, filled about 3/4 of the way with a couple of bales of straw, a bag of potting soil, lots of leaves and garden clippings, branches, etc, from fall yard clean up. See how we built and filled these beds in fall here.
In spring, we then filled up the beds with compost from a local landscape company. Judging by the bits we found in the compost, it comes from the green bin program. We did not add a compost garden blend but instead filled them to the brim with pure compost. I will admit to having a few qualms about how well things will grow in such a rich medium... but everything grew spectacularly well, including the carrots.

Other Organic Amendments To Consider
Carrots prefer a soil that is neutral to slightly alkaline, though will grow just fine if it is a bit off in either direction, alkaline or acidic. We tend to have slightly alkaline soil here on the prairies, while the west coast tends to be a bit acidic. Both are just fine for growing great fruits and vegetables.
On the west coast - It used to be common practice to lime the garden beds annually, and some gardeners still do this. I am not a big fan of mucking about with pH, as going too far either way can really wreak havoc on your garden and be very difficult to fix.
However, if you are having a really tough time with your carrots (beets and asparagus) and feel that you have good soil with everything else is growing really nicely, then adding a bit dolomitic lime to raise the pH level a titch is a fine idea. It also adds calcium and magnesium to the soil, both of which are great for growing amazing tomatoes and peppers, though not potatoes! Follow the directions on the bag for the correct amount to apply. Please do not do this on the prairies where our soil is alkaline already.
Phosphorous for root veggies - Root veggies like carrots, beets, celeriac, radishes, etc… benefit from less nitrogen and more phosphorous and potassium, the second and last numbers on any fertiliser or compost bag (N-P-K).
Nitrogen, the first number, gives you stronger above ground growth
The middle number is phosphorous which makes more flowers and stronger roots.
The last number is potassium, provides your plant with overall good health.
For root crops like beets and carrots, adding bonemeal (phosphorous) and kelp meal (potassium) will boost root growth and overall health.
Alternately, you can use an organic fertiliser with a ratio of 1-2-2 (or multiples thereof). Some of these fertilisers are called ‘bloom boosters’ but they also benefit food crops, so don’t worry about the name but concentrate on the numbers instead. Gaia Green has an organic product called Power Bloom which is a 2-8-4 that you can add to your root crop beds. They also have an all purpose 4-4-4 if you prefer to just feed the soil in general.

Sunshine
For big, sweet tasting carrots, you want a minimum of 6 to 8 hours of sunshine per day. The more the merrier.
Sowing Seeds
Here on the prairies, I sow carrots twice a year. In spring, I start in May but we can sow right up till early August. The later in the summer, the smaller/shorter they will be when we harvest in late October/early November. I sow another batch again in October, trying to show just shortly before first frost. This gives me bigger carrots earlier the following summer.
On the west coast, I sowed three times a year. Spring (May), first week of July (no later! Sowing in August will give you small, hairy carrots), and around winter solstice (late December).
As a general guideline that works anywhere, you want to sow 40 to 90 days before you want to begin harvesting.
Warmer soil will give you faster germination and longer, bigger, better tasting carrots. Beginning your spring sowing when night time temps are around 10°C (50°F) is ideal.

To grow in rows… make shallow trenches 1/4 inch deep that are 6 to 8 inches apart. Sow the seeds 1/2 inch apart and cover the seeds with soil. My raised beds are tall, about 2 feet high, so I lay the handle of a rake across the bed to keep my rows straight, use a small hand held hoe to make the furrows, and then cover. Tamp the soil down to firm the seeds in place or they may end up floating around when you water (especially if you are sowing in mid-summer, when soil sometimes becomes hydrophobic - repels water).

To grow in blocks… Rake the soil surface to soften the soil down 1/4 to 1/2 inch deep. Scatter the seeds onto the soil’s surface. Try to scatter them so that they are an inch or two apart from each other. After sowing lightly sift soil over top of the seeds to cover and tamp down with the back of a rake, as above.
Carrots are also sold in seed tapes that properly space the seeds, or in pelleted form to make it easier to sow them the right distance apart. They cost more and you have less varieties to choose from though.

Thinning seeds- Once your carrots tops are an inch tall, you will likely need to do some thinning out. Your carrots will be small, will not have room to size up if they are too close together. Thin them out so they are at least 2 inches apart from each other.
I do not thin mine. I try to sow my seeds an inch apart so that I do not have to. For one thing, it is an onerous job, no fun at all, hah! For another, each time you disturb the carrot foliage, you run the risk of attracting carrot rust flies.

Watering
When you first sow your carrot seeds, you will be watering them daily, if not twice daily. Carrots (and parsnips) take anywhere from 5 to 21 days to germinate and must be kept moist until you see the greens popping through the soil. If they dry out at any time during the germination process, the seeds will die; they will not recover if you start watering them again. They germinate faster in warmer soil.
Sow the seeds, water thoroughly with a watering wand until the soil is damp well below the seeds.
Covering them with burlap sacks helps the soil stay damp longer. Water the sacks down really well after sowing, and daily thereafter. I lift the sacks to make sure that the water is indeed going through and soaking the bed.
After a week, begin to check for signs of germination, remove the sacks when you see some greens popping through. The rest will soon follow.
If you are sowing in summer time when you soil is so dry that water beads up on top, water the furrows before you sow, then water again as above.
If you prefer to scatter sow your seeds to grow them in blocks, water the entire area down well first, then sow your seeds, sift soil over top to cover, water as above.
After the carrots have germinated and you can see the wee green tops, slow down the watering to one or two deep soaks a week.
Over-watering may result in small carrots, carrots that split down the middle, or hairy carrots that do not taste great. Carrots want sunny beds, rich, loose soil, and a good, deep watering once a week.

I use weeping hoses in my beds to deep soak the beds about every 5 to 7 days. You can do the same with drip tube systems.
Deep, slow watering less often will always give you better crops than hand watering with a wand or can. If you have to do your watering by hand, it is going to take you a really long time to get that water down deep enough to make nice, big, long carrots. Use many cans of water per row. Shallow watering will stress out the plants, resulting in small carrots that are less sweet, and may be woody.
Carrot Rust Fly
The only real problem we tend to face with carrots is the dreaded Carrot Rust Fly. This fly will lay its eggs at the base of the carrot, the larvae will soon emerge from the eggs to begin feeding on your carrots, leaving ugly black trails and holes throughout the roots. These flies will be present from spring till frost so can affect your crop at any time during the growing season.
To organically prevent this damage, there are a few things that you can do…
As it is a fly, you cannot spray for it or pick it off. The best and most effective way to prevent damage from these guys is to net your crops. A bug mesh works best because it breathes, water goes through it, sunshine goes through it, but the mesh is so tight that the flies cannot get in to lay their eggs. You can also use a lightweight white garden fleece but it tends to hold in the heat so is less desirable for summertime growing.
Whatever type of cover you use, make sure to pin it down well on the sides. Just laying the fleece or mesh over top of the bed will not work, the flies will crawl underneath if they find any sort of access.
Companion planting with strong scented flowers, veggies, or herbs to confuse the flies. Planting beside onions or garlic is helpful as they are strong scented. Calendula and marigolds are strongly scented flowers, or plant honey scented sweet alyssum.
Crop rotation and weed control - Practice crop rotation to help prevent issues from arising or building up in the soil. Keep your bed well weeded and hoe through the top centimeter or two of soil in spring to uproot grubs, bugs, eggs for the birds to eat.

Storage
In cold zones where your ground freezes - Leave them in the garden till you have had a few good frosts to sweeten them up. Lift, remove the green tops, wash and dry really well, place in a plastic bag with a paper towel or two. Place them in the extra fridge crisper drawer to use as needed. Check on them once/twice a month and replace with fresh paper towels.
In temperate zones - Leave them in the garden and harvest as needed. Try to use them all up before spring the following year or they will begin to get hairy, then woody, and then flower to make seeds.
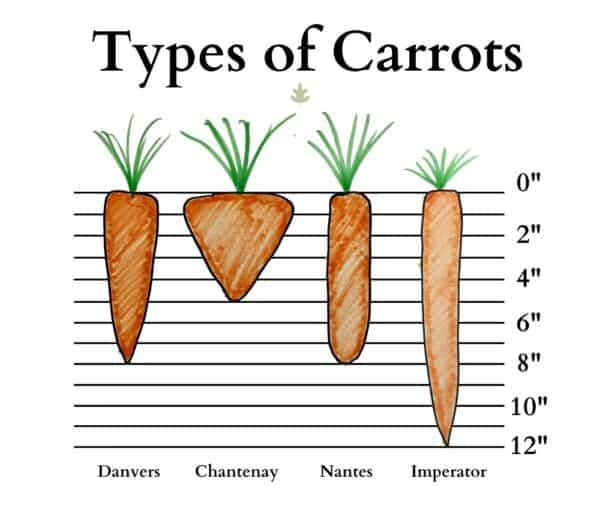
Types of Carrots
There are basically 5 types of carrots. They are divided up into categories by their shape and size.
Nantes - Nantes carrots were first mentioned in seed catalogues in 1885 as a carrot variety with nearly perfect cylindrical roots and smooth, almost red, skin that is mild and sweet in flavor. These are usually the easiest carrots for home gardeners to grow, always producing sweet, crisp, cylindrical roots, about 6 inches long, with blunt tips. Nantes carrots perform well even in heavy, rocky soils where other carrot types twist and fork. Starica, Bolero, Napoli.
Imperator - The long, skinny, tapered carrots that you see in grocery stores. You need nice, loose, friable soil to grow these carrots, and they can easily grow 11 to 12 inches long. Atomic Red, King Midas, Triton.
Chantenay - Before Nantes were developed, Chantenay was the best carrot for heavy or rocky soil. They are short and wide, shaped like a soil dibber, about 4 to 5 inches long. A great choice for those gardening in containers. The Chantenay is one of my most favourite carrots to grow as they are super reliable, need no peeling, are always sweet and yummy, great for fresh eating or roasting.
Danvers - These carrots are 6 or 7 inches long and skinny, taper to a point at the ends. They originate from Massachusetts and grow well in all types of soil. This is the other carrot that you will often see at the grocers.
Miniatures - These guys are the wee little guys… short or round mini carrots. They only reach 3 to 4 inches long, are typically served whole with the tops attached. Perfect for growing in containers or shallow garden beds. Varieties include Babette, Romeo, Paris Market.
Other carrot information worthy of note…
Containers -If you have poor or really heavy soil, carrots can easily be grown in pots. Just add some compost or manure to your potting soil for nutrients and they will grow really well.
Trench Amending - If you have really hard packed soil, dig a trench, fill the trench with sifted black earth and compost, sow your seeds into that trench for nice straight carrots.
Nitrogen - If you are getting carrots that are all twisted up, you likely have too much nitrogen in your soil or have been using a lot of manure. Compost tends to be a better amendment for carrots than manure.
Flowering - If you have left your carrots in the garden in spring, you will soon find a flowering plant that looks a bit like Queen Anne’s Lace. That is the carrot flower. It is very pretty but will soon be covered in carrot seeds. Looks a lot like dill seed. To harvest them … cut and place into a paper bag… shake.

Quite honestly, carrots are one of the must grows in my garden annually. We eat a lot of carrots ourselves, either fresh or roasted, but mainly, I grow carrots for the dogs. Our pups love them. We have never yet had a dog who did not come running when we offer up carrots.
I have grown pretty much all the sorts, shapes, sizes, and colours. I am not a fan of the whites or yellows, though I like the reds and purples. Orange carrots are good for everything but taste great raw, while I think the reds and purples are a bit less sweet, and zingier? Spicier? so I like them best roasted with some olive oil and and Himalayan pink salt.
We used to grow 300 to 600 carrots a year but now that we have a smaller potager and have to store them indoors, we've cut back to about 200.


Comments