Seed Starting Guide - How to Start Veggies & Flowers From Seed
- Feb 27, 2024
- 15 min read

This is a seed starting guide for two sorts of people....For new gardeners who don't want to invest in a whole lot of equipment till they figure out how much seed starting they want to do in the future, and also the reluctant indoor seed starters. Those of us who don't really love starting seeds indoors, would rather be making this mess outdoors, in a greenhouse, anywhere besides inside the house...
Not to worry if you actually enjoying starting seed indoors, this how-to works for you, too!
It's a how-to grow guide for those of us who start from seed because we like something a little 'odd, unusual, or different', something other than what is generally sold at the greenhouses in spring. Or, we want large amounts of something that would cost an arm and a leg to buy at the shops, but just pennies per item if we grow it ourselves.
We start from seed because we want what we want.
If, like me, you are a bit reluctant to have a house full of seedlings, I recommend starting only the plants that you really want and cannot get from the shops.
If you want a couple of basic pepper types, for example, buy a red bell and jalapeno start from the nursery in spring. If, however, you want to pickle a peck of peppers, it is well worth your while to spend $4 on a seed packet and start them indoors yourself.

Why I do what I do - I've been starting flowers and vegetables from seed 'professionally' (as in, at a greenhouse to make a profit) for a great many years.
Although I have always started a bit of plants from seed, I starting growing en masse when I worked at a greenhouse in Bon Accord. We used no lights to start/grow the seeds (ever), but always bottom heat. We did not heat more space than we had to, we used sunshine instead of lights, had regular tables and such, no fancy shelves or set ups. Just normal, everyday things (see this post about how we started thousands of seeds, on the cheap). We started nearly everything you buy at the greenhouse from seeds and cuttings. Perennial flowers, yep, annual flowers, yep, herbs and vegetables, yep.
There were 3 of us sowing seeds daily for 2 months straight (mid-Feb to mid-April). Although my passion is (always has been) growing food crops, at this greenhouse I was the perennial flowers manager, so I started perennial flowers from seed.
The takeaway - you do not need fancy, or pricey to start from seed.. but a heated greenhouse helps. Seeds do not need a light to germinate but benefit from bottom heat.

To successfully start your seeds indoors, inside the house, here is what you need to know.
Fist and most importantly, do not start too early. Check the back of the package or go to the Stokes seed catalogue (see the growing information section under every seed) for the best time to sow. Most all plants are started in March to go out in May. Is always better to start a bit later than too early.
Second - There is no need to prestart everything. I start many of my veggies but will direct sow as much as I can and only prestart flowers that I cannot purchase from local shops. Some veggies prefer to be sown directly into the garden, like root crops, peas, beans, squash, and cucumbers. Zinnias are very prone to mildew so I always direct sow them, too.
What You Need
Small celled pots or something shallow to start your seeds in. Can be roast chicken trays, clear cookie clamshells, dollar store cake pans. Any kind of container that is shallow, holds soil, and can have holes punched into the bottom.
Potting soil. Pro-Mix or Sunshine #4 are my favourites. Ideally a high porosity soil. Nothing with moisture beads, no special seed starting mix. Good potting soil is a must.
Labels/tags ( I often use yoghurt containers, just cut the sides into strips)
Marker or paint pen for labelling
Heating mat
Humidity dome or cling wrap
Plant tray with no holes (optional) to hold your pots. Can also use aluminum trays or baking sheets.
Seeds, of course : )

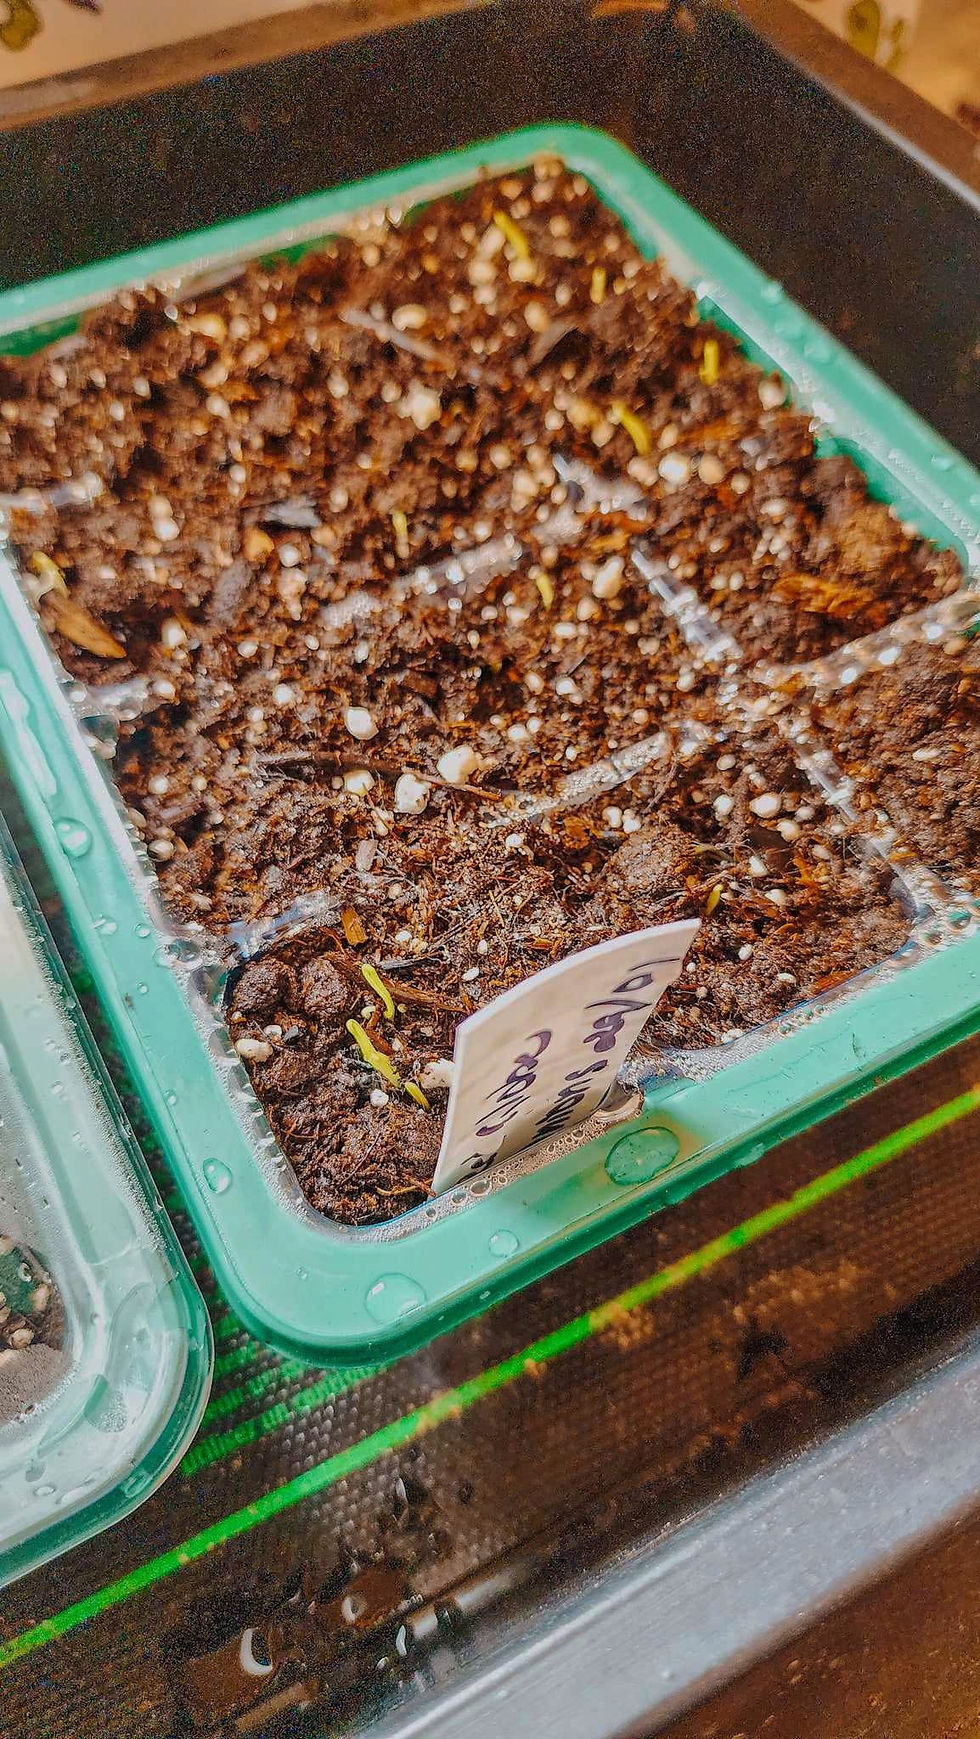
Seed Trays - I picked up this pack of 10 seed trays this year, these cute little green ones in the picture above. They come with the bottom tray, 12-cell inserts to plant into, a humidity dome, and a few labels. I placed them into a black tray with the heating pad at the bottom. I like these a lot. They are easy to move around, tidy, easy, you can grow anything in them.
You can also get the same mini seed trays with 6 cells, like a traditional 6 pack. I use both.
Again, you absolutely do not need to buy anything special. You can use anything that holds soil and has drainage. Dollar store cake pans. Bakery clamshells or cake trays. Roast chicken trays.
You want to start the seeds in a fairly shallow container. The only thing that you might want to start in a small pot or solo cup at this stage is something with a big seed that does not need transplanting, like artichokes, peas, or beans.
*As an Amazon affiliate, if you purchase an item from one of these links, I make a teeny bit of money to support my blog. It does not cost you a penny more than it would if you went to the item on your own, without my link. Huge thanks : )

Potting Soil - You want to use a good quality potting soil, not garden soil or bagged 'black earth'. Ideally, you get the kind that says HP (high porosity) so it has lots of perlite in it. This makes the soil nice and loose, easy for those new roots to spread throughout. While you can use anything you have on hand for the rest of the seed starting equipment, great potting soil is a must. I highly recommend Sunshine #4 or Pro-Mix. You can usually get these readily at any garden centre or garden shop.
Like someone I know once said, you never want to use anything that starts with the word 'Miracle'. I heartily agree. That is all I am going to say about that, haha.
My cube of Pro-Mix has been downstairs in the furnace room since fall, waiting for seeding time to roll around. You all, by January, it was so crazy dry!
To moisten the potting soil, you can do one of two ways....
Place some soil into a big bowl or basin, add warm water, let sit till the soil has absorbed the water. Mix. Fill your containers loosely to the top with the damp soil.
Fill your seed container with the dry potting soil, fill the bottom tray half full with warm water. Place your cell pack into the tray, let it and slowly soak up the water from the bottom. Drain out the extra water.

Sowing The Seeds
I do most of my winter sowing using a method called multi-sowing (sometimes called mass sowing). This is something we did at the greenhouse all the time, as we were growing dozens, sometimes hundreds, of the exact same plant to sell to customers come spring. Saves a whole lot of space when starting seeds, they get either transplanted or planted out in the garden afterwards.
Multi-sowing means if I want 5 tomato plants of the same variety, I will sow 8 seeds into one single cell. Always sow a few extra than you want, just in case not all seeds germinate.
If I were to only want 1or 2 of the same plant, I will sow 3 seeds into a single cell.

I used to start 60 varieties and sow the whole packet of 25 to 30 seeds in one cell!
What I Multi-Sow
Even though I grow a whole lot less plants now that I no longer sell them, I still use this method as it's a great way to start a lot of plants in a small space. And my space indoors really is small.
Peppers, celery, tomatoes, eggplants, onions, leeks, and perennial flowers are all things that I sow in this manner. They are plants that grow slowly, are started many weeks earlier than they can go outside, and I want to grow a fair amount of them.
I do not multi-sow cool weather crops that grow quite quickly. Veggies that only stay in pots for a short time, like broccoli, cauliflower, brussels, even lettuces and spinach. These I sow just 1 or 2 seeds per cell. They stay in the pack for just 4 to 6 weeks max and grow fast, then they are planted out in the garden.
Also I do not multi-sow most annual flowers - To start flowers like marigolds, thunbergia, geraniums, seed dahlias, etc... I usually sow just 2 seeds into one cell. They stay in the same pot/cell-pack till I plant them outside. If you want large amounts of any of the flowers though, say 50 marigolds, multi sowing is space saving. Start them all in a tray, then transplant into pots, 6 packs, or cells when they're a couple inches tall. With any luck, by then you can pop them outside in your coldframe, greenhouse or mini greenhouse or tote.

How-To
Fill your trays with damp potting soil. Do not pack it down, just fill it lightly to the top of the tray, pick up the tray and drop it down on the counter top once or twice. This will settle the soil but not pack it down, so the roots easily grow into the medium.
Sow seeds on top of the damp soil.
Lightly cover the seeds with soil. Some will use vermiculite, very fine gravel, or sand to cover the seeds.
Use a spray bottle to dampen the soil. Or if you have a misting nozzle on your hose. A strong stream of water may dislodge the seeds.
Place onto a heating mat. Heating mats are the key to getting seeds to germinate quickly. They are safe to use, just lightly warm so will not harm any surface that you put them on, are safe for little fingers.
Cover seed tray with a humidity dome, or with some cling wrap. Or place in a clear plastic bag. The goal here is to keep the moisture and heat around the seeds so that they germinate quickly. Kind of like a sauna for the seeds.
Do not water again till surface is dry. You will likely not have to water the soil, plants, for at least a week. I find that the humidity dome has been off for a few days and seedlings are coming up nicely before I need to water for the first time. Seeds need damp soil, seedlings want to be kept on the dry side.

8. Don't forget to label your seeds. Add the date to the corner of the tag so that you know when you started them, when to expect to see germination, keep track of how long it takes.


I use these labels as they cost much less, but I actually prefer these white ones, if I can get them at a good price. They are thicker and a bit longer. Both are reusable, just wipe clean with nail polish remover. Oh, and this oil based paint pen will last, does not fade like Sharpie ink does.

Mind you, I also use yoghurt containers cut into strips, haha, so I'm not that particular.

9. Once or twice a day, tap the humidity domes to get the excess moisture off of them. You can also open the vents for a few hours on sunny days. If you are using cling wrap, just flip the entire sheet over once a day.
10. Once you see germination beginning, remove the humidity dome but leave tray on heat until all seedlings are up. Once all seedlings are up, remove from bottom heat.
If you leave the humidity dome on, you are apt to get fungal diseases like damping off. We now want air on the seedlings and drier soil.
At this stage, you have probably not had to water the tray even once.
As long as you do not water till the soil is dry and take the dome off, you should not get damping off disease. You can also set up a fan to blow on the seedlings to make seedlings stronger, prevent disease, and keep the surface of the soil from being too wet.

Transplanting
Your seedlings will to be transplanted in the garden, or a larger pot so you need to decide what you have room to grow inside the house. Do not start your seeds too early, check the timing on the package.
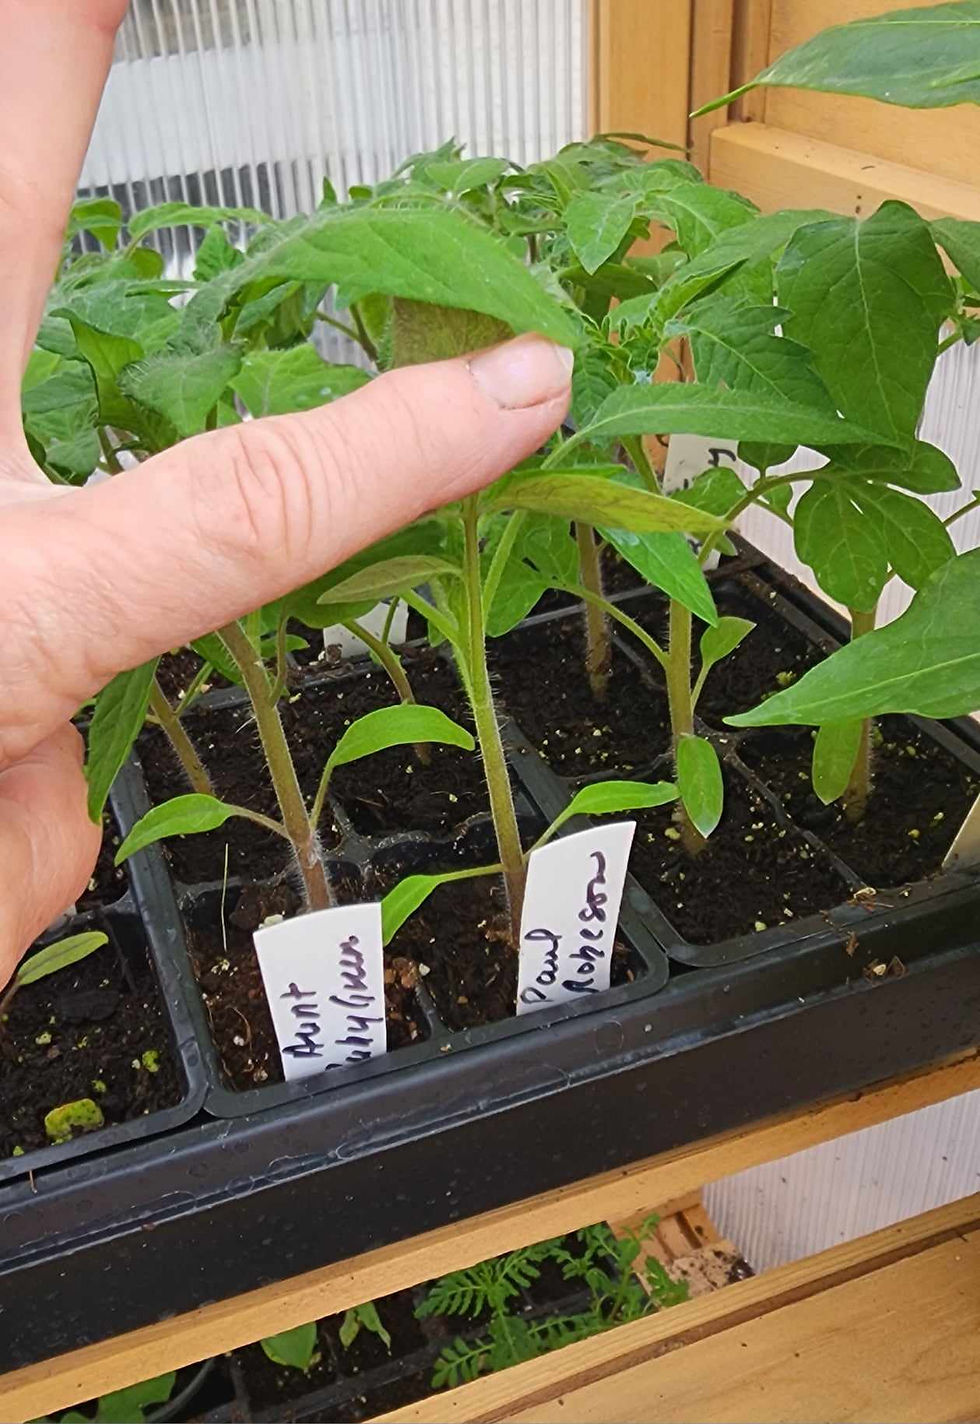
11. Transplanting - When your tomatoes and peppers have made true leaves (or it they're a bit lanky) it is time to transplant them into larger pots. Solo cups are popular with home gardeners for this step.

12. To transplant - Fill your pots as you did for seeding - not packed tight, using damp good quality potting soil. I like to add a bit of compost or manure in with my potting soil for this growing phase. (5 parts soil/2 parts compost). Drop the tray on the countertop twice to settle the soil.

Make a deep hole in your potting soil with your dibber, or a pencil. All the way to the bottom of the pot.
Dump the seedlings out of the pot. Tease apart the seedlings. Grab the seedling by a leaf, not by the stem, and drop it into the deep hole you made in the damp soil. Hubby makes the hole wider if he is having a hard time getting the seedling all the way down. I use the dibber to push it down by the roots. Not to worry, they are less fragile than you think.

Make sure to plant deep! When you are transplanting most anything at all, you want to plant it down so that the soil level is just one cm (half inch) below the leaves. Do this with everything - flowers, tomatoes, peppers, eggplants, flowers...
Note #1 - If you are transplanting small things like herbs or lobelia, take a small clump of the seedlings and plant them all together. Do not plant really delicate plants deeper.


Note #2 - I like to leave peppers, eggplants, and sometimes tomatoes on the heating mat for just a little while after they have been transplanted to get them off to a good start. Tomatoes only for a couple of days as they can stretch out pretty quick, but the others maybe a week or so? Till I feel that they are standing tall and feeling happy.
Here Are Some Pot Ideas


green seed starter trays with larger cells/(reusable) small 3"pots / 4" round ones.


Large, deep 6-packs /silicone pots / 20 pack of square silicone pots.
I have not tried the new silicone pot, they are pricey, but well worth it it they last a while.
(OR)
These trays with 18 reusable 3.5" pots from Vesey's.
Not recommended
Coconut fibre/coir pots - plants do not thrive in them.
Clay pots - love them, but not for seedlings. They dry out too quickly.
Jiffy pots/peat pots are just a terrible product, the pots turn green and slimy, plants do not thrive in them.

12. The hardest part when growing seedlings indoors is to keep them from stretching out after they have germinated. This is when they require a bright but cool location.
After they have been transplanted, place them in a bright cool window. In the sunroom? Maybe in the basement? Maybe a spare bedroom? Maybe the formal living room window? Too much heat and/or lack of light will cause stretched out, lanky, unhealthy plants. This is why you never want to start your seedlings too early, they are harder to keep happy indoors.
I have two windows where I can keep my seedlings bright and cool, the kitchen nook and the spare room. Both have nice, bright, south facing windows so work very well till I can put the seedlings out into the greenhouse.
The key to growing without lights is to have your seedlings in direct sunshine for as much of the day as you possibly can, and to turn the trays a couple of times a day so they don't stretch for the window.
If you need a bit of extra light, longer days or brighter days, an LED Grow Lightbulb in an ordinary table lamp works great.

13. Seedling Care after Transplanting
Watering - The soil will be damp when you first transplant them. Let it dry out before you next give them water. You want the surface of the soil to be dry and keep your seedlings on the dry side always. Damping off can still happen at this stage, too.
If you prefer to water from the bottom, add water to the tray, let sit for a few minutes, dump out the excess to prevent fungal issues and fungus gnats. Dryer is always better.
Feeding - Do not start feeding until you know your seedlings have transplanted well and are starting to put on new growth. The compost in the potting soil will help to feed them for quite a while.
If you feel they are getting pale, stunted, or the leaves are starting to curl upwards, you will want to feed them with some kind of fertiliser. An organic gardener friend swears by Cal-Mag but you can use any water soluble vegetable or all purpose fertiliser you like. Use it at half strength on your wee seedlings.
I like to use liquid seaweed as a foliar feed ( I spray it on the leaves) but you can also to water with it. I swear by Reindeer Liquid Seaweed (a small mom and pop company on the island). A dahlia grower I know in Nanoose uses this on her plants and swears by it, as well. It is liquid gold!
Keep them light and bright but on the cool side so they do not stretch out. As soon as you can start bringing them outside, do so, even if they look kind of wimpy. They will soon be nice, stocky seedlings.

14. Acclimating the seedlings to the outdoors. As soon as the daytime temps are in the plus 10°C range (+50°F) you can start bringing your seedlings outside for the day. This will make them stronger, sturdier, healthier.
A wooden mini greenhouses, or a plastic one, are great for getting seedling out of the house, keeping them from getting lanky, and starting to harden them off. If you are putting your warm weather crops out there, they will need to come indoors for the night till it is at least +5°C at night. Cool weather crops like brussels, cauliflower, broccoli, spinach, etc can all handle cooler temps and light frosts.
Clear tote bins that you lift out for the day, in for the night, are also great for this purpose. They are reusable, stackable, work great as mini greenhouses.
You can also just lay the trays out on the deck or a table, etc... you do not need anything fancy. I just like the totes or mini greenhouses as it also keeps the cool wind off of them.

Totes being used as mini greenhouses. Photo from Higgledy Garden.
15. Hardening Off the Seedlings - Once temps are getting to be reliably around 10°C (50°F) at night, you can start readying your plants for planting out in the garden. By leaving the lid off the totes, keeping the greenhouse door open, you are hardening off your seedlings, getting them ready for the sunshine and elements.
Make sure to not cook your seedlings! It is very common to forget about your seedlings so they fry to a crisp, I'm afraid. All that work for naught. You want them to be in the direct sunshine for just a few hours in the weaker morning sunshine, then in the shade for the rest of the day. Do this for a day or two.
Then put them into the sunshine for a few more hours a day, rest of the time in the shade.
This sounds more complicated than it really is. I really don't want you to stress over it too much. Just do not go from straight from the house to full on direct sunshine or you will broil your little seedlings.
Offering them part time sun can be as simple as having them on a table under a tree so they get some shade when the sun moves. Or, I like to put them under the patio table or chairs, getting full on sun for a while, then dappled shade for the rest of the day. Or on the northside of the greenhouse so it gets some morning sun and then shade from the greenhouse for the rest of the day.

After a few days of slowly increasing their time in the sun, they can be in full sun all day long till you are ready to plant them out. Late April on the west coast but varies here on the prairies.

If you have a greenhouse.....
If you have an unheated greenhouse, your seedlings can go out once you can keep the greenhouse at 5 to 10 °C at night (40 to 50 °F).
I have an 8'x12' unheated greenhouse that I will start to clean up in March (after this cold snap is over) and then begin move in the seedlings by end March (though not yet the tomatoes, peppers, eggplants, any of the heat lovers).
I start by bringing out the flowers, cool weather veggies, celery, onions, leeks, lettuces and use a small portable heater at nights to keep it just above freezing.
The end of March, early April is also a great time to start cool weather crops inside the greenhouse. Whether a larger greenhouse like this, or your mini.
I use this greenhouse to harden off seedlings, hold all my purchases from the greenhouse, and to get a head start on my bulbs, dahlia tubers, and hanging baskets in spring. In summer, I grow heat lovers like melons, peppers, and tomatoes inside.

Final Note
Only do as much as you enjoy doing, start as much as you feel like starting. No one will be asking you if you purchased seedlings or grew them yourself, they will just ooh and ahh over your green thumb and amazing garden.
I enjoy starting my own plants in a heated greenhouse, but do not enjoy doing it inside the house. Some folks get a thrill from checking their seedlings every day while I wonder how soon I can get them out of the house, hah! I am an avid gardener but a reluctant indoor seed starter. I do it because I like what I like.
I like heirloom tomatoes, peppers, and eggplants but they are hard to find at shops or greenhouses, so I grow my own. I like some flowers that are hard to find in my small town, things like thunbergia, pink calendula, purple amaranth, snapdragons in pastel hues, so I grow my own.
I wait to start as much of the cool weather crops out in the greenhouse and then enjoy myself immensely! Let the soil fly! I purchase the rest of my seedlings at independent greenhouses and my local Co-op and Home Hardware store. Many, many seeds I direct sow in April and May.

Happy Growing ~ Tanja


Hi Tanja,
It's Denise from the island...still following you like nursing foal! This is an amazing piece of work...I love it and will be using when I start my seeds ( 2nd year). I've been holding off, started way to soon last year! I'm going to order the little starter kits with the adjustable humidity lids from your page....look like a great idea! I do have one question. I think I kept my seedlings too warm last year. I noticed you say to "Keep them light and bright but on the cool side so they do not stretch out." I do have a good room that hits the light/bright but it's not heated at all. What would you …