How to Turn Your Front Yard Into A Food Garden
- Sep 8, 2023
- 7 min read
I was asked how one designs and builds raised beds to create a food garden in the front yard. I'm going to throw out several ideas as I don't know what the actual yard looks like, her personal style, or the bylaws as they vary depending on where one lives. Some places will allow raised beds and full on food gardens while others will want you to be more subtle.

In this post you will find edible landscaping ideas to suit you, your house, your style, and your neighbourhood. It is really long but I hope you enjoy the scads and scads of information. You all know that I am chatty, like to explain everything! So in this post I have also added tons of pictures to help you choose your style and get ideas. All pics have the links added to give credit to the original poster and for you, in case you want to look further into the information.
What's The Look In Your'Hood?
I highly recommend growing food all over your property, from front to back, back to front. The more food, the better... but keep the look of the neighbourhood in mind before you start your build. Style your edible landscaping in a way that aesthetically fits in with both your house and the neighbourhood. No one wants bylaw coming by to give grief. Plus, it is super easy to make it pretty so that the neighbours love it just as much you do.

If you are in a mature neighbourhood with older homes, yards may be planted up right to the sidewalk, withy little to no lawns, so you can happily plant a lot of food and plants in the whole yard, along with flowers, of course, and have your yard fit right in. How pretty is this front yard food garden, eh?

On the other hand, if you are in an area where most of your neighbours have lawns or stones, more minimalistic plantings, you will want to plant your food in a way that suits the house and the neighbourhood. Think subtle, like these rectangular beds as above. Could also be three beds along the right hand side of the yard, leaving a bit of an open courtyard area.

If you live in an area with traditional homes, where your neighbours tend to have a lawn, a foundation flower bed, and maybe one tree out front, you can pretty much go any way you like... modern, carefree, or somewhere in between, as in the pic above.

Formal or Informal?
Another thing to keep in mind is whether to lean towards formal or informal designs. I love very formal with all the squares, rectangles, and nice straight lines. I match my planters on the left side with the right side. Balance is everything.
Informal designs have curves, circles, and winding pathways that might lead you to a secret garden, arbour, or keyhole garden. They tend to look more natural and carefree.
What To Plant?
Plant up your front yard food garden with a blend of ornamental and edible plantings, adding perennial flowers, shrubs, and trees in with your edibles for year-round interest.
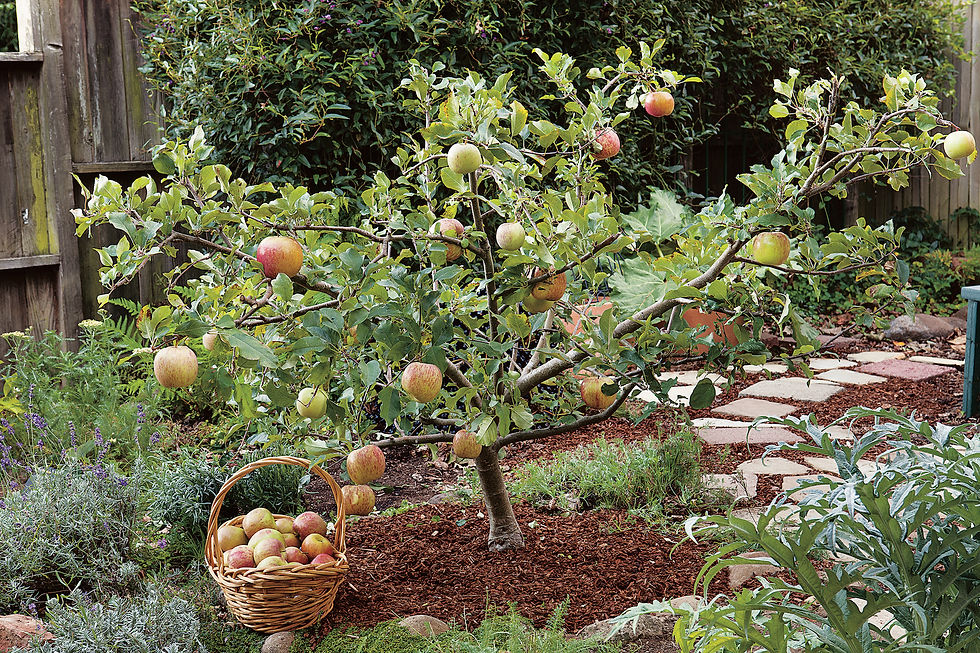
Fruiting trees, vines, and shrubs are the easiest way to grow food in the front yard and no one is the wiser. They look just as pretty as anything else. Apples, pears, cherries, peaches, apricots.. grow anything you like to eat. Our last potager had grapes and blackberries growing beside the climbing roses, blueberries and currants in with the shrub roses, plum trees, apple trees, and even a peach tree growing throughout the yard, alongside the ornamental plantings.

Blueberries, if you are in a temperate zone where they grow well, look as beautiful as any ornamental shrub. Their foliage turns red, orange, yellow in the fall - just stunning.
If you are in a colder zone, like my zone 3 prairie garden, you can grow currants, elderberries, haskaps, nanking cherries, jostaberries, gooseberries, and more, in amongst your flowers, or grow them as a hedge instead of cotoneasters.
Plant a Saskatoon instead of a lilac if you have room for a larger shrub, or one of the new cherries from the Sweetheart series (Romeo, Valentine, Juliet, Cupid, Crimson Passion, Carmine Jewel. These guys all grow anywhere from 6 to 12 feet tall and almost as wide.

Vegetables look pretty and will blend right into the flower garden. Swiss Chard has such lovely stems, dinosaur kale grows tall with dark green crinkly leaves - looks so pretty), lettuce comes in so many colours, tuck it in everywhere or make a 'patchwork quilt' with the varied colours.

Grow garlic and leeks anywhere with their pretty strappy foliage, tomatoes on stakes or in cages amongst your dahlias, peas and beans up towers or on the side of an arbour, alongside your clematis and climbing roses.
Herbs, like chives, basil, thyme, are so pretty that they can be used anywhere... border plants in a formal bed or dotted here and there. Lavender and hyssop, too. Careful with mint as it will spread and be hard to control, even in colder zones.
For more ideas on how to incorporate edibles into your landscape, this potager planting article is superb.
So, now that you know you can grow anything you like in the front yard... how do you design the actual beds?

Design Ideas
1. This is dead simple. The easiest way to make your food garden look intentional is to make a large kidney bed, or a berm bed, that runs across the front of your yard. Don't want to hide the house? Make it along the side of the yard, or in an L-shape for even more garden space. Make it a little bit raised, distinct from your pathways and lawn. Like this picture above but plant it up as a food forest.

Here are two good reads about creating a food forest. This one and this one. The second one explains and shows you how to blend ornamentals with edibles.


2. Add an arbour or pergola, something with height to grow vining veggies on and add interest to your garden. Helps pull it all together.

3. Plant it up with ornamentals and edibles.
Add the bones of the garden first.... a fruit tree or two. maybe an ornamental tree, depending on the size of your planting area.
Add some fruiting shrubs, plus ornamental shrubs, roses, and perennials for colour and interest. Perennial flowers like lilies, black-eyed Susan, coneflowers, salvias, and catmint are hardy, pretty, and will give you colour and food for the pollinators from spring thru fall.
Each spring, add plenty of both vegetables and annual flowers in amongst the 'bones of the garden'.
The Nuts and Bolts / How-To Build the Beds

When planning and building your beds, keep in mind the look you are after, and the cost. Raised beds, like in the picture above are very practical, they warm up faster in spring, provide great drainage, and in places where there is rock or hardpan under the surface (like Vancouver Island), they give you the depth you need to grow food.
Raised beds can be made out of wood, rocks, bricks, corrugated metal, or metal feed/water troughs. Anything that will hold the soil in the beds, as simple or fancy as you like.

To grow most any vegetable, you only need 10 to 12 inches of growing depth. In this depth you can grow everything from root crops like potatoes, carrots, and parsnips, to tomatoes, cukes, and everything else. On the island, we placed the beds directly on the hardpan and built them in place, they were not anchored to the ground except with some rebar to keep the sides from bowing out.

These taller beds we built here are made mostly the same way. For the how-to for how we build our raised beds, see here.

The drawback with raised beds is that they can be quite costly to buy or build, materials may be hard to comes by, and they might not fit in with your look or style.

If you are on the prairies, or can go down, is easy to build the beds directly in the ground. It becomes more difficult if you want that natural look but live on a rock. Building a berm, a raised bed with no sides, is the way to go. It gives you the depth you need for the roots, works for everything from trees and shrubs to flowers and veggies.
Taper the sides down and mulch after planting to retain moisture, keep weeds from germinating, and make it look finished. The mulch and soil will not spread into your lawn or pathways (adding this as that was my worry when we built the beds in the picture below).

Build up the bed to at least 12 inches high. We went 12 to 15 inches high when we built our front yard berm bed on the island (above) as it sinks a bit with time.

Where we planted the trees, we dug a hole that was really big and a foot or two deeper (we used a tractor) but if you are on hardpan in a temperate zone and do not have access to a tractor, you can give more root room by planting into a bottomless large planter, like a half wine barrel with no bottom.
You do not need to do this with shrubs, they will do just fine in your raised berm. Do not do this on the prairies, your trees will not survive being above ground.

To make it easy to build a berm bed right on top of your lawn, use the lasagna bed gardening idea. Also called hügelkultur. Place down some cardboard to smother out the grass. Wet it down. Top with all sorts of garden waste - tree trimmings, leaves, vegetable vines and plants, dump out your hanging baskets and summer flower pots on it, soil and all. Top with garden soil or compost to plant into.

I hope you made it all the way through this super long post, and I that you find it both helpful and informative for getting started on your front yard food garden.
Happy Food Growing, My Friends ¬ Tanja


Comments